 Day two of kids camp at the studio was yesterday. Holding steady at about 20 kids per session; not too big. Keeping with the beach theme, today I decided on some pastel palm trees.
Credit where credit is due, this one came straight off of Pinterest; it was so repinned the original artist was lost. If you know the original please comment so I can give credit! I did flip the position of the palm trees, though, to sprout from the left-hand side. Otherwise, all lovely lovely Pinterest.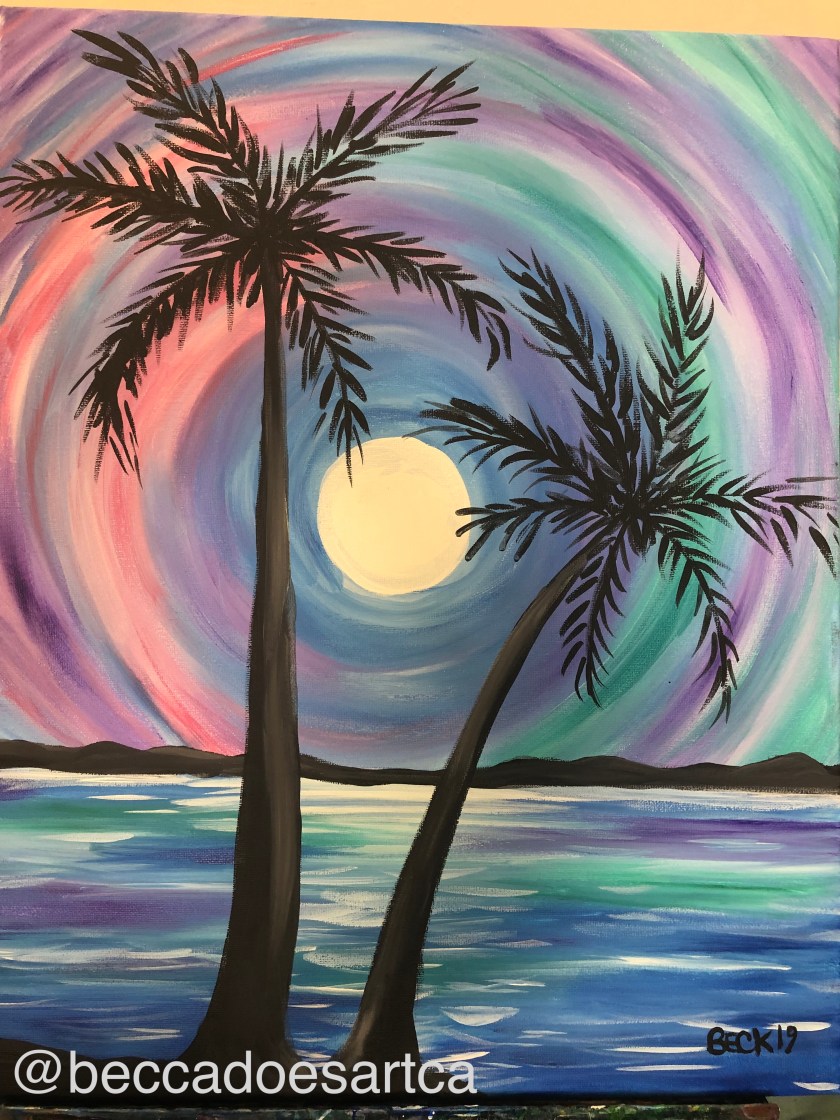
As per usual, I had a sample for the kids to look off of that I painted at home (that’s it up above.) We started with blank canvases, my three favorite brushes; size 1 round, size 6 round and size 6 short/flat. We could have used a larger brush for the sky, but I choose the smaller brushes to help them slow down.
{PRO-TIP} Tailor the brush for the time you want to work on your projects; larger brushes spread paint faster so if you want kids to slow down, give them smaller brushes.
On their pallets to start with today, I gave them all the colors I used for this project; white, blue, purple, teal, phthalo red (light red) PLUS I gave them a tiny amount of fluorescent pink, fluorescent orange and yellow in case they wanted to choose a different color scheme for their sky as pastel isn’t for everyone. As always, I hold off on giving any black paint out until we have finished our backgrounds.
{PRO-TIP} Black paint can ruin a paint pallet very quickly. For little ones, wait to put out black until the end or put just a small amount out when you need it. Don’t give them black at the start!
SWIRLY SKY
First, let’s add some boundary lines to where we aren’t going to paint. With your small size 1 brush, dip into some blue paint, and go ahead and outline a circle in the middle of the canvas to block out where the moon will go. You can adjust the size up and down if they paint it too small or too big. Encourage kids to make their moon bigger or smaller if they want. Now with the same color and brush, go ahead and draw a horizontal line about 1/3 up the canvas to mark where the sky will end.
{PRO-TIP} Boundaries: especially with kids who can be heavy painters, at the START of the painting, mark off parts where you will stop painting an element like a sky or block off an element you don’t want kids to paint in, such as a space you will fill in with white or light colors later.
Now, switch to the size 6 round brush; we will use it for the rest of the sky. Mix some, but not ALL, of your white together with your blue paint, you don’t have to mix it all the way — if you leave it a bit marbled you can get some variation or you can dip into just white paint or just blue paint as we go. In a circular motion go around the area you blocked out for the moon. Keep going around until you have built up a ring around 2 to 3 inches thick.
{PRO-TIP} When mixing colors together or toning with white, remind kiddos not to mix ALL of their colors into each other if you plan to use them later on in the painting.
I remind kids at this point that it is ok to not my same color scheme, and to pick the next color they would like to use, but just follow the step with their color of choice – but no matter which color they are going to want to mix up a bit of white with it.
Next, wash your brush and mix together white and purple paint the same way we mixed the blue and white in the previous step. Then, go around your moon in a circular motion in the same way as before, but make sure to overlap the purple just a little; don’t put your next color on the white part of the canvas, put the first stroke down on the blue then work out in a circular motion onto the white part.
Now wash your brush and mix together white and teal [or your next color choice] the same way as before, and now add color in a circular motion, but this time just on the right side of the moon.
Now wash your brush and mix together white and phthalo red [or your next color choice] the same way as before, and now add color in a circular motion, but this time just on the left side of the moon.
Since I have older kids mixed with younger, at this point if they have gotten the hang of going around the moon with circles and half circles, they may go ahead and build up color all the way to the edges and boundary line at the bottom; try not to paint over the boundary but its ok if you do a little.
{PRO-TIP} Mistakes on purpose: sometimes just to show kids it’s ok to mess up and not, in fact, the end of the world, I will purposefully paint over the boundary I created just a bit, or draw a shape slightly lopsided to show them that perfection isn’t the goal and get them to be ok and work with their mistakes.
If kids do choose to follow along, continue adding alternating rings of purple & white and teal & white on the right; and purple & white and phthalo red & white on the left. As you continue to go out with the half rings, add layers of blue & white to the top and sides as well. Encourage kids to paint the top [if they can reach] and sides as we go.
OCEAN
We want to build up all the color behind the white waves first, then add the highlights last. Switch to the size 6 flat brush, mix together some blue and white paint, then paint a line going down about one inch down on top of our blue boundary line for the ocean, using sweeping back and forth strokes.
{PRO-TIP} A lot of younger kids will try and use a brush like a marker; essentially rubbing the side of the bristles on the canvas – warping and ruining the brush. I try and remind the kids to use the brush like a broom, not a toothbrush. You want to sweep the floor on your painting not brush your teeth.
Next, wash your brush and, if you are still following along with me dip into some purple mixed with a bit of white and using the same back and forth motion add a bit of purple mixed with white, just on the right-hand side. Otherwise, use your color of choice.
Now, wash your brush and dip into some teal mixed with a bit of white and using the same back and forth motion again, add a bit of teal mixed with white, just on the left-hand side. Otherwise, as always, use your color of choice.
Continue adding alternating colors of blue, teal purple and white – or the color of your choice — all the way to the bottom of the canvas. Paint the edges of the canvas as you go down. When kids have finished the whole background, they can flip their canvas on its side (from portrait to landscape) and paint the top and bottom. Kids who finish first can work on that while others finish up the ocean; you can always go back and paint the sides later.
{PRO-TIP} For stretched canvas, flip the canvas on its side in the easel so kids can paint the top and bottom edges.
Now wash your flat size 6 brush and dip into just white paint. Show kids that you can hold a flat brush vertical (standing-up) for a thick line, or horizontal (laying-down) for a thin line. We want laying-down for a thin line. Remind them it also matters how hard they press down, too. Now paint a white line across the canvas, right on top and covering of where the ocean meets the sky. For these steps, it’s totally ok if your ocean is still wet.
Now switch to the smallest size 1 brush. Dip into just white paint, and using light back and forth strokes, add the highlights and reflections in the ocean. Concentrate your highlights to the middle under your moon.
BREAK
At this point in camp, we all find a stopping point and pause. The kids eat a snack, I take my break, and then come back and dole out black paint as they return to their stations. It also gives those backgrounds time to dry before you plop some land and trees down.
LAND
Using the size 6 flat brush, dip into black paint, using the brush laying-down, paint a line across the canvas above the white line we made where the sky meets the land. Now go back across above that black line, this time making a wavy line to form the tops of some mountains. Fill in any gaps with black paint. Remind kids mountains aren’t perfect! If they want to make them a bit more 3d looking like I did, they can mix in a bit of white paint to make a dark grey, and go over the tops of the mountains with the dark grey.
Next, using the same brush and black paint, paint the piece of land jutting out in the foreground. Starting about an inch up on the left-hand side and slope down to the middle of the canvas. make sure to have a wavy line at the top of the land; remember, land isn’t perfect!
PALMS
Ahhhhh the palm trees, the focal point. The tricky bold black focal point. In the studio, we have white art paper rolled onto our tables, and I encourage the kids to practice tricky steps before they put them on their canvas, you could easily practice on paper as well. I have them follow along with me doing a practice one, then if they have any questions we can fix it before it goes on the canvas. I also encourage kids who don’t want the palm in their painting, to still practice drawing to learn for the future. Once they have practiced it at least once and are pleased, they can go ahead and put it on their painting, or follow along with me.
With the smallest brush dip into some black paint. Paint the trunks of the palms first. Pay attention to how tall you make them; its easier to start at the top and go down into the land. You can always make the land a little longer as well. Make sure your base is thicker and that it tapers going up toward the top. You can also make them look at bit more 3d by mixing some white into the black to make a dark grey and concentrate it in the middle of the palms where your moon is.
Now using the same brush, paint the lines for the middle of the palms, you don’t have to do as many as me, but do at least 3 so it looks like a palm. Next add the individual leaves angled down the leaf, like a feather; not jutting out at right angles. Concentrate more leaves toward the middle, or even add some coconuts. I also showed them how to do the simple letter “M” birds in the sky, and added them to my in-class painting:
At this point, you can go ahead and sign and you’re done!
This one got a little tricky with not making our rings solid stripes. Might add more rings of just white next time to break it up a bit better. No complaints though. A lot of kids explored different color options and added birds or other things. Even had an eclipse! I got a bit scared we might end too early, but it was only about 10 minutes earlier than usual. I’d really rather err on the side of finishing early instead of going over with a project this summer.
Next week: Art lab. Got a mixed media and a ripped paper craft planned out with several fun options for the kiddos to try. Thanks for reading!
