It’s been hot this week in NorCal. Perfect time for a beach themed painting!
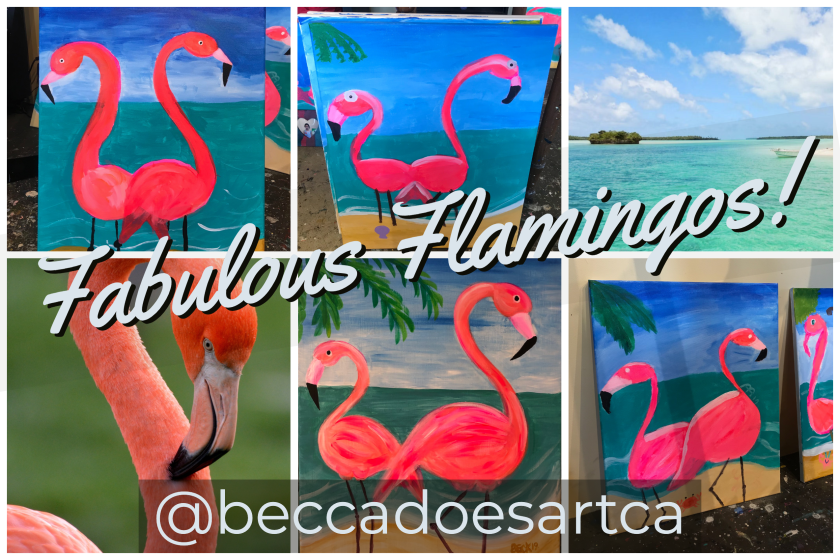
Summer art day camp kicked off this Monday at the studio, but I did an offsite this week at a tech company so my official first day of summer camp was today. I chose flamingos for my first subject this summer. I’ve got kids aged 5-14, so picking out something not too complicated and not too childish can be a balancing act. Presenting,
Everyone started with a blank canvas, fluorescent pink, fluorescent orange, white, blue, teal, green, yellow and ochre acrylic paint, but NOT black. I learned not to put out black paint with kiddos until you get to that particular step, and if at all possible make it the last step.
{PRO-TIP} Black paint can ruin a paint pallet very quickly. For little ones, wait to put out black until the end or just a small amount out when you need it. Don’t give them black at the start!
Another tip I wish I had picked up was tailoring the brush size for the time spent; smaller brushes slow small hands down. (We are together for 3 hours, I don’t want to finish a painting in 30 minutes.) We used a size 6 short/flat, size 6 round, and a size 1 round brush for detail work.
{PRO-TIP} Tailor the brush for the time you want to work on your projects; larger brushes spread paint faster so if you want kids to slow down, give them smaller brushes.
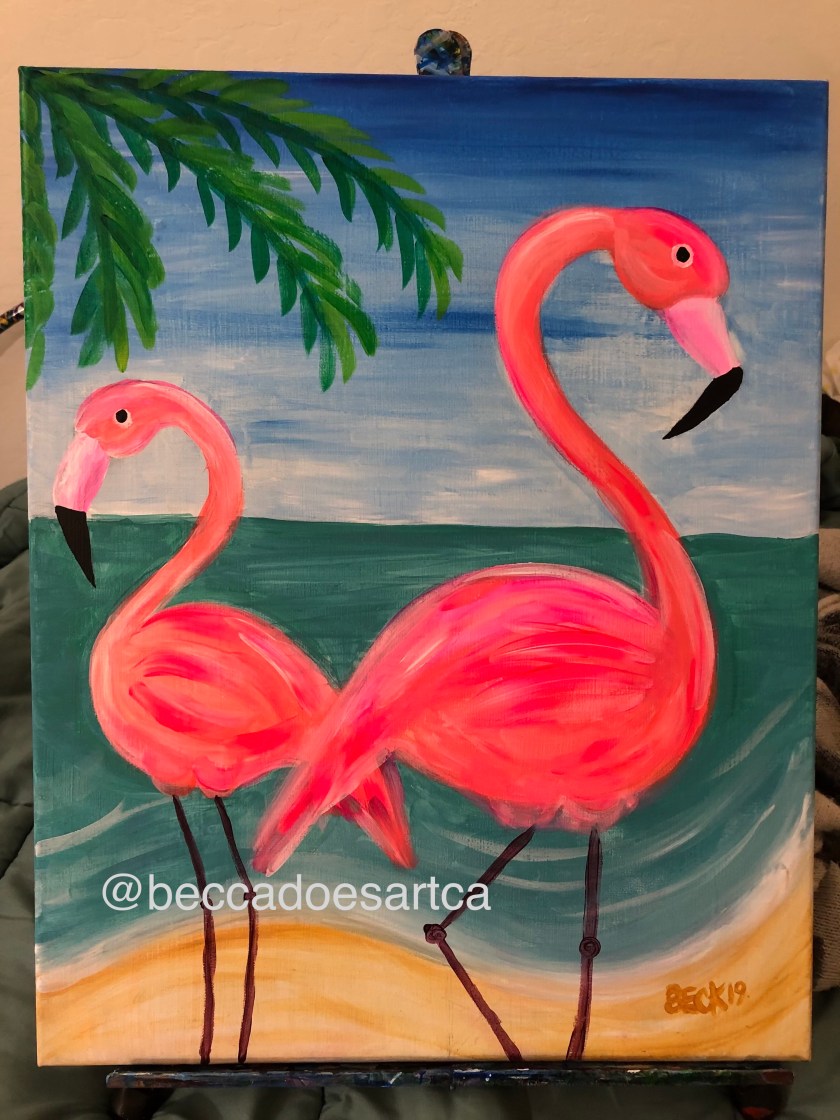
I had a sample to look at from home:
We all started [eventually lol] together, and using the smallest size 1 brush outlined the basic shapes for the flamingos.
OUTLINE FLAMINGOS
Start with a large letter “S” for the big flamingo, then the slightly trickier backward letter “S” for the smaller flamingo. Pay attention to how big the letter “S” is and how tall it is on the canvas. (I forgot to take pictures of the step by step this time so I hope to sketch it out digitally later… we shall see!)
Next, add oval; egg shapes for the heads, then larger oval egg shapes for the bodies. Now thicken up the necks. Kids can go ahead and add the tails and it is totally ok if they overlap each other. Any little mistakes right now are ok too since you get to paint over them, plus you can always wipe up mistakes before they dry.
{PRO-TIP} For BIG boo-boos, baby wipes or wet paper towels work like magic erasers as long as the paint hasn’t dried yet.
Now to add the funky beaks. Start by adding a regular beak similar to a peacock or a chicken, then add another beak below the first one so they come together at a right angle.
BACKGROUND: SKY, OCEAN & BEACH
SKY
After you have the flamingos outlined, you want to change gears and paint your background. Switch to the flat size 6 brush, dip into the blue paint from the top add a strip of blue across the canvas going about an inch to an inch and half down. At that point, go ahead and start mixing in white to the blue paint to lighten it, and go almost halfway down the canvas with the blue and white color. It is totally ok to add back in more white or blue to lighten or darken or add some clouds. Try not to paint inside the flamingos as you go down, but its ok if you do — we will paint over it.
{PRO-TIP} When mixing colors together or toning with white, remind kiddos not to mix ALL of their colors into each other if you plan to use them later on in the painting.
OCEAN
Next, we can fill in our ocean. With the small round size 1 brush, go ahead and draw a wavy line at the bottom to show where the ocean will meet the sand. There is no right or wrong wavy line! Once you have the line down, switch to the size 6 round brush and fill in the ocean with teal, you can lighten it with white or add green or blue to change the tone. Wash the size 6 round brush and add wavy lines following your beach to put some white waves and foam. make sure to cover the line where the ocean meets the beach with a strip of white.
BEACH
Now we can fill in our sandy beach. With that same round size 6 brush, take ochre and white and fill in your sandy area at the bottom. Kids can add footprints and I showed them a simple crab and seashell.
{PRO-TIP} Always have extra things in mind for speed painters to add to their paintings when you hear the dreaded, “I’m done! What do I do now?”
In our camp, it was time to take a break for a snack; which allowed our backgrounds to dry a bit before we filled in our flamingos and added the palm trees. It also allowed me time to munch down my broccoli, snap peas and cheese stick 🙂
FILL IN FLAMINGOS
Next, we can use that same round size 6 brush to fill in the body of the flamingos. Use a combination of fluorescent pink, fluorescent orange, and white. Kids can make it more pinky or more orangey. If they want to add more depth, add more white to the top of the head and top part of the body, as if a light were shining down.
Once you have the body filled in, you can add strokes of just orange or pink for the wing feathers and tail feathers and the little puffs where the legs come out. Then, take the smallest size 1 brush and mix pink and white together so it is lighter than the body part you just painted, and fill in the top part of the beak. Now using just white paint, paint the white background of the eyes. Hold off on the black part of the beak, eyes, and legs for right now.
PALM LEAVES
Using the small size 1 round brush paint 3 or 4 lines coming down off the left corner of the painting; kids might need to adjust where at the top their palm leaves come down, they may have made some very tall flamingos indeed. Remind them it is ok to move them around, put them in front of or behind their flamingos as needed. Some kiddos skipped the palms altogether. Some kids added simple “M” birds in the sky as well.
{PRO-TIP} Don’t forget to adjust placement based on how big kids put another element; remind them it is ok to move things around or make them bigger or smaller. All artists do it!
BLACK PAINT
Finally, I hand out the black paint [huzzah!], and the first thing we add in is the black beaks with the small size 1 brush; which is all we will use for the rest of the painting. Then you can fill in the dots for the eyes; I learned to use the wooden back end of the small size 1 brush for small circles and dots.
{PRO-TIP} Use the wooden back ends of brushes for small circles and dots. Q-tips work wonders too!
Next mix in a little bit of black in with the base color you used for the body, this will give you the purple color for the legs. Add lines for the legs and circles for the knees. Kids can sign their painting with the small brush. I meant to start having them write their name on in pencil as well; perhaps next time!
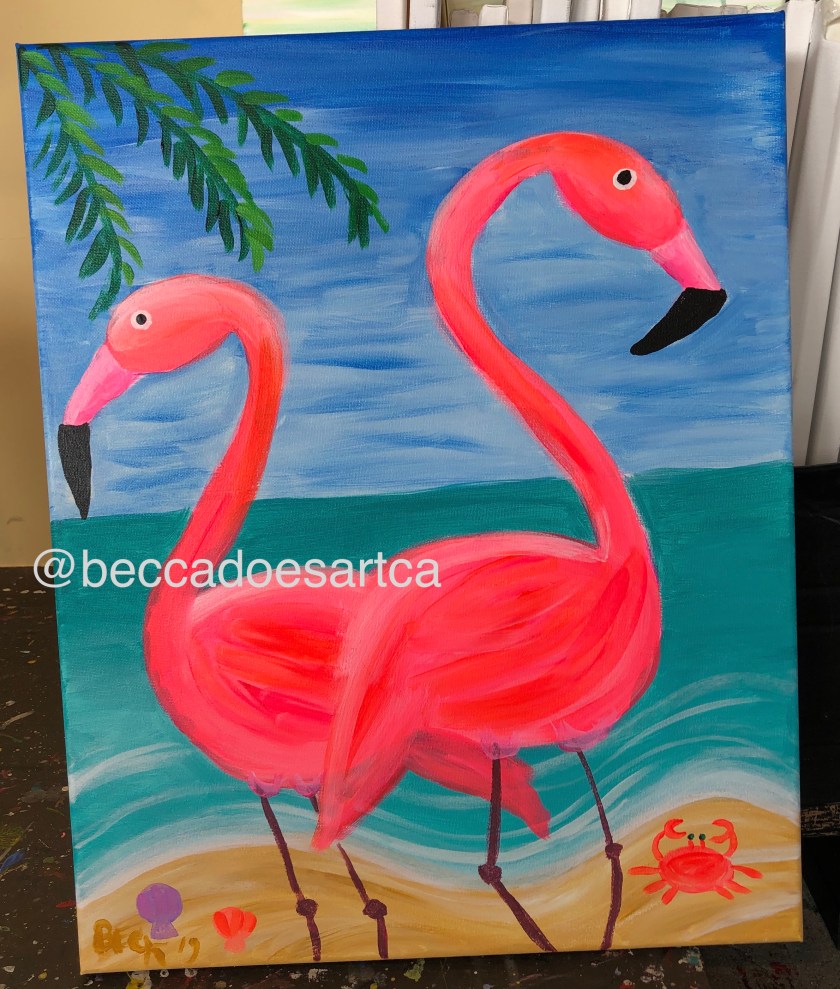
Here is what my in camp painting ended up turning out like, complete with crab and shells:
Riiiight as we wrapped up the power to the whole strip where the studio is located, went out to many gasps. Not too much of a big deal lighting wise, with the large windows, except it was quite a hot day. So we had to stand in the doorways as gatekeepers since we had to open up the doors. Another snag was the little darling that needed to potty in the windowless bathrooms right at the surge. I had to hold my phone light over the stall, and of course, she picked the one without toilet paper. Luckily I was right there to toss some over. Good ole PG&E had it back up before morning pickup/lunch.
Aside from the excitement, overall I’d say it was a well-received project, and trust me I’ve had some ones that fell flat fast. Kids seemed pleased with this one, and the additions with the shells and crabs flowed well. I caught a couple of parents taking pictures of the sample and their kiddo’s work which is always a good sign.
Whew. One more day tomorrow… and 11 more weeks to go. I’ll try and add more content as I teach it. Thanks for reading!
